If you want your blog to reach more readers, using the right keywords is essential. Keywords are the terms people type into search engines when looking for information. They help your content show up in search results, making it easier for your target audience to find you.
SEMrush is a powerful tool that makes finding and analyzing keywords easy. Whether you’re new to blogging or have been writing for a while, SEMrush can help you discover keywords that will drive traffic to your blog and improve your search rankings.
In this guide, we’ll show you how to use SEMrush to find the best keywords for your business blog. You’ll learn how to analyze competitors, explore related keywords, and build a list of valuable terms that can enhance your content. Let’s get started!
Understanding the Basics of Keywords
Keywords are the words and phrases that users enter into search engines when looking for information. They play a crucial role in helping your blog content reach the right audience. Understanding the different types of keywords and their significance can greatly improve your content strategy.
What Are Keywords?
Keywords are the bridge between what people are searching for and the content you create. By incorporating relevant keywords into your blog, you increase the chances of your articles appearing in search results.
Short-Tail vs. Long-Tail Keywords
Short-Tail Keywords: These are general keywords that typically consist of one or two words (e.g., “marketing” or “shoes”). They tend to have high search volumes but are also highly competitive, making it difficult to rank for them.
Long-Tail Keywords: These are more specific phrases that usually consist of three or more words (e.g., “best marketing strategies for small businesses” or “comfortable running shoes for flat feet”). Although they have lower search volumes, long-tail keywords often lead to higher conversion rates, as they target users with specific needs or intentions.
Why Keywords Matter
Using the right keywords in your blog helps search engines understand what your content is about, making it more likely to be displayed to users searching for those terms. Effective keyword research can lead to increased organic traffic, better engagement, and improved rankings in search results.
Setting Up Your SEMrush Account
To begin using SEMrush, you’ll first need to set up an account. Here’s how:
Choose a pricing plan that suits your needs (SEMrush offers a free trial for new users).
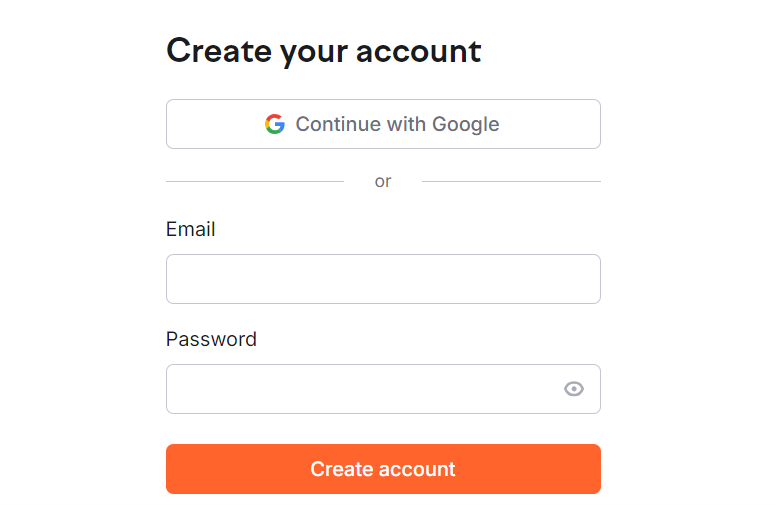
Complete the registration process by providing your email address and creating a password.Click to view full size (opens in new tab)
Once your account is set up, you’ll be ready to start your keyword research journey.
Finding Keywords with the Keyword Overview Tool
The Keyword Overview tool in SEMrush is a great starting point for your keyword research. Here’s how to use it:
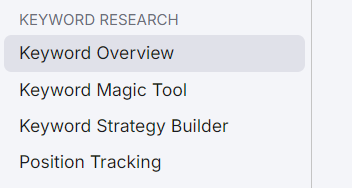
Log in to your SEMrush account and navigate to the “Keyword Overview” tool.Click to view full size (opens in new tab)
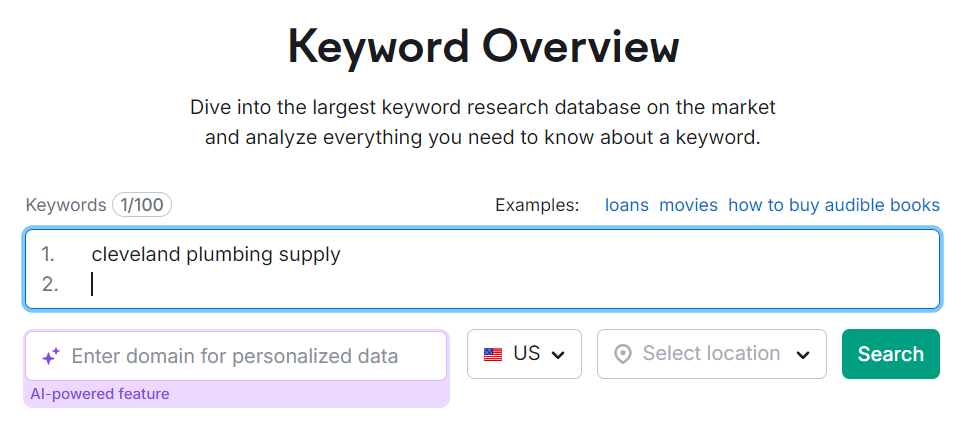
Enter a keyword or phrase relevant to your business in the search bar.Click to view full size (opens in new tab)
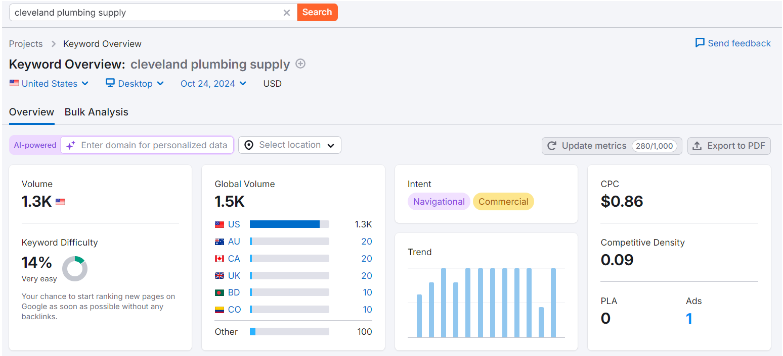
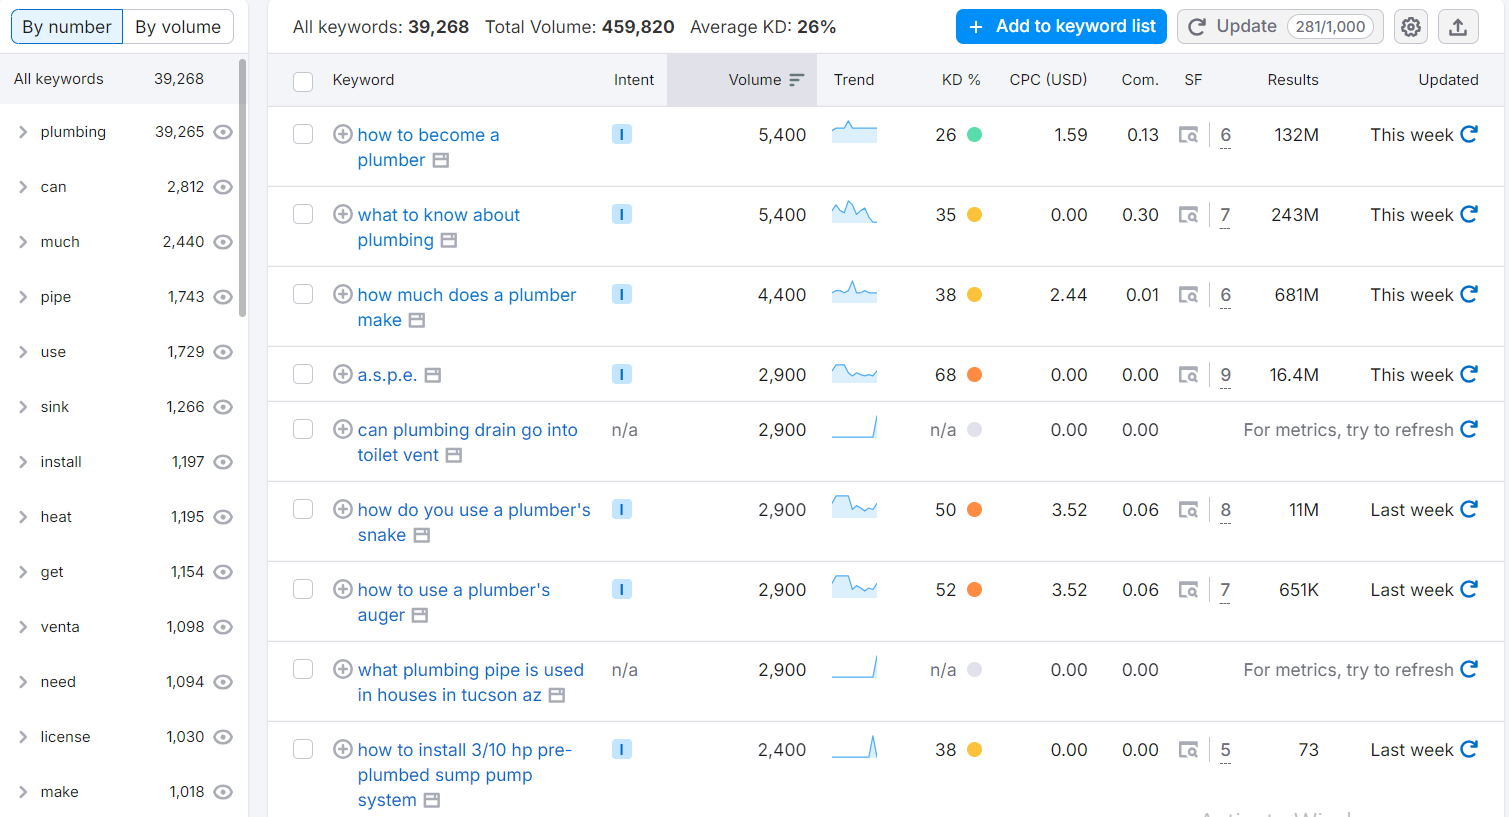
Analyze the results: You’ll see important metrics, including:
Search VolumeThe average number of times users search for this keyword each month.
Keyword DifficultyA percentage indicating how difficult it is to rank for this keyword.
CPC (Cost Per Click)The average cost advertisers pay for clicks on ads targeting this keyword.
Click to view full size (opens in new tab)
These metrics will help you gauge the potential of each keyword for your blog.
Exploring Related Keywords
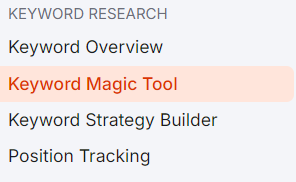
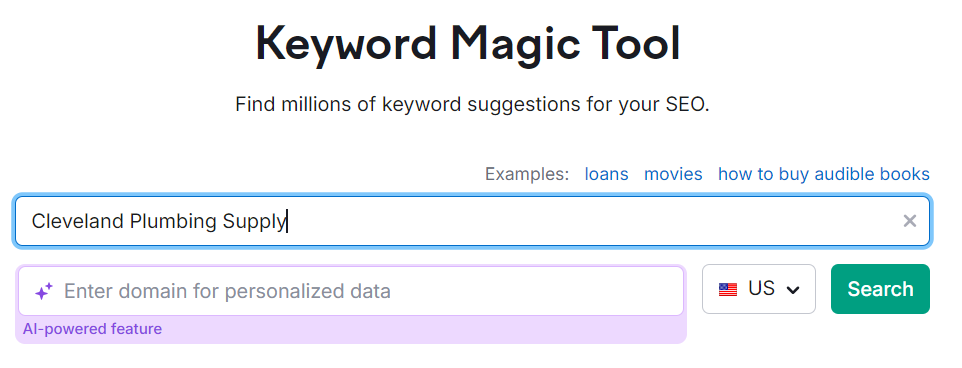
To find additional keyword opportunities, use the Keyword Magic Tool in SEMrush. Here’s how:
Access the Keyword Magic Tool from the main dashboard.Click to view full size (opens in new tab)
Enter your seed keyword into the search bar.Click to view full size (opens in new tab)
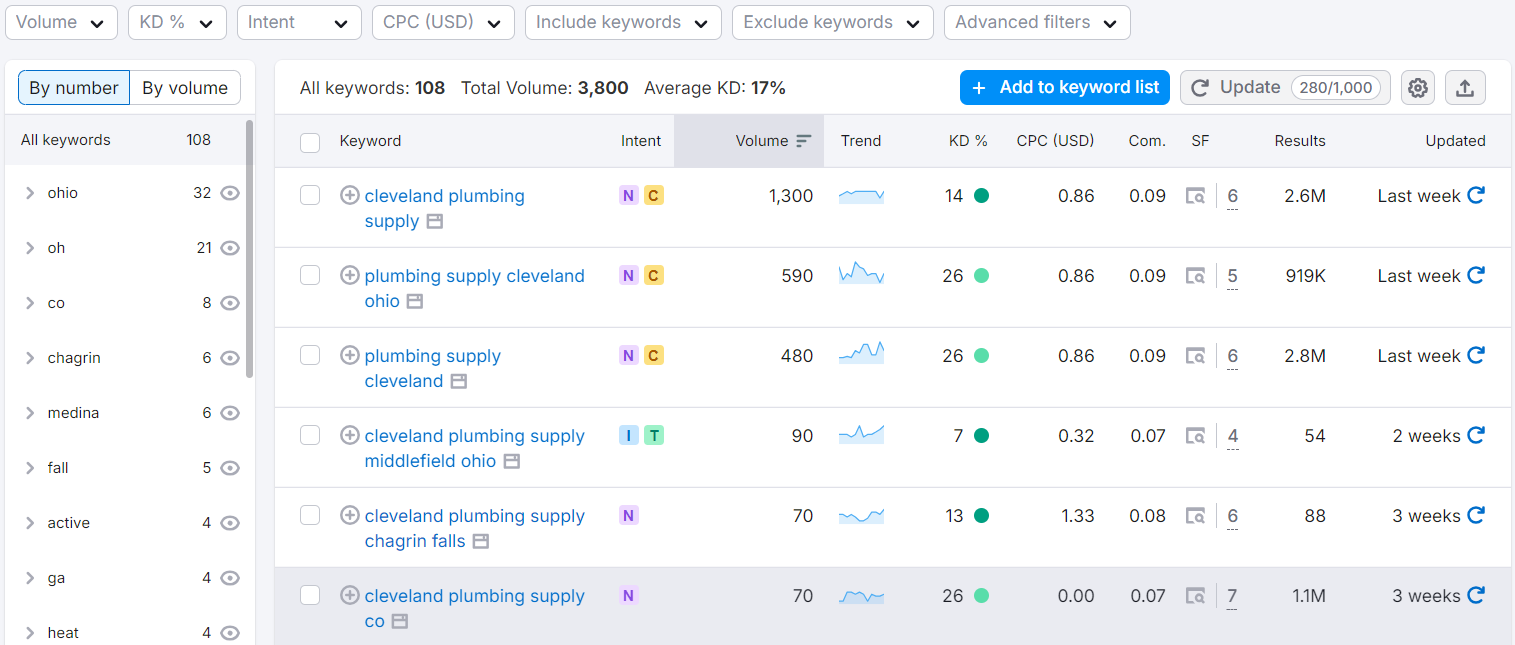
Filter the results based on metrics such as search volume, keyword difficulty, and more.Click to view full size (opens in new tab)
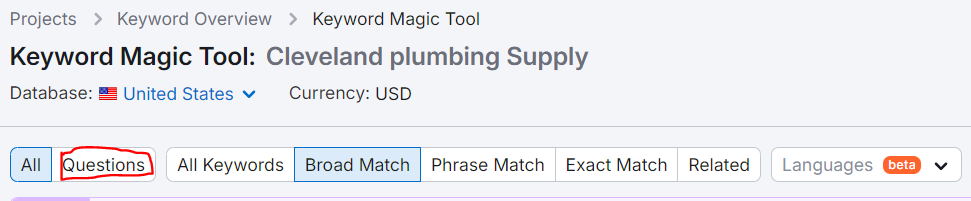
This tool will generate a comprehensive list of related keywords, including variations and long-tail options. You can even sort keywords by questions, making it easier to address user queries in your blog posts.
Analyzing Competitor Keywords
Understanding what keywords your competitors are ranking for can provide valuable insights. To do this, follow these steps:
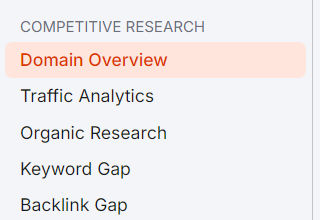
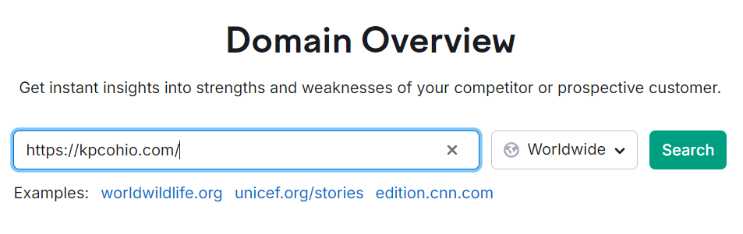
Go to the Domain Overview feature in SEMrush.Click to view full size (opens in new tab)
Enter a competitor’s domain into the search bar.Click to view full size (opens in new tab)
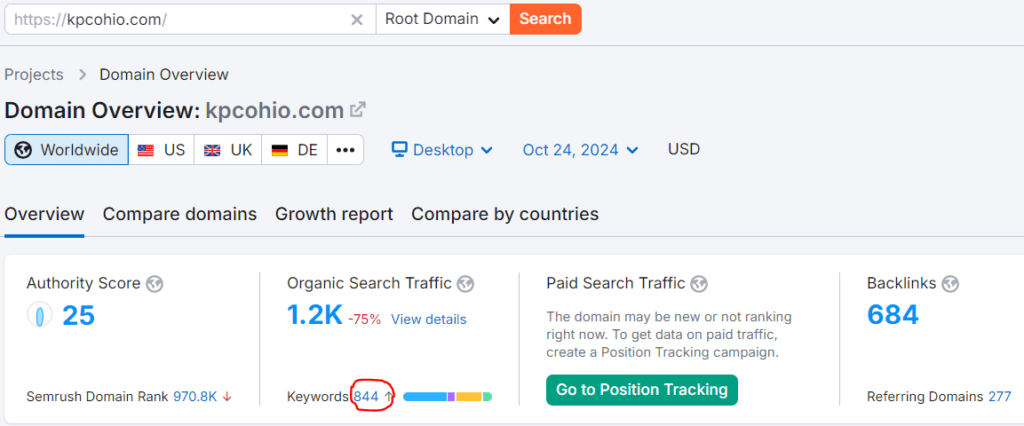
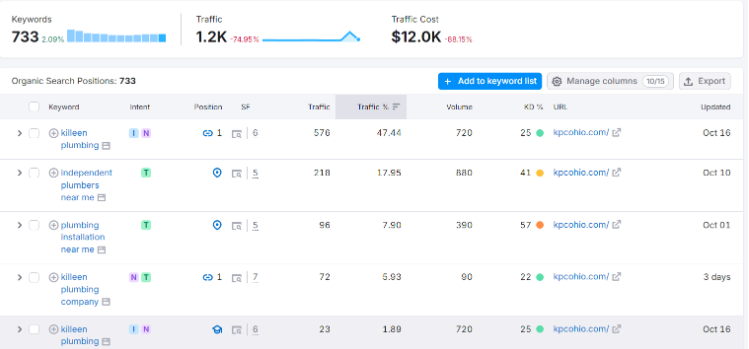
Review the keywords they rank for, along with their estimated traffic and position in search results. To see specific keywords, click on the number displayed in front of the keywords under the “Organic Search Traffic” section.
Select keywords that align with your business goals and services.Click to view full size (opens in new tab)
This analysis helps you identify potential gaps in your own keyword strategy and discover new opportunities for your blog.
Finding Keyword Ideas Through Questions
User questions are a great source of content ideas. SEMrush allows you to find these queries easily:
Use the Keyword Magic Tool again, and filter for question-based keywords.Click to view full size (opens in new tab)
Explore the list of questions generated to find topics your audience is curious about.Click to view full size (opens in new tab)
Incorporating answers to these questions into your blog posts can enhance user engagement and improve your chances of ranking well in search results.
Evaluating and Selecting Keywords
Once you have a list of potential keywords, it’s time to evaluate them. Consider the following metrics:
Search Volume: Look for keywords with a decent search volume to ensure there’s interest.
Keyword Difficulty: Aim for keywords with lower difficulty, especially if your site is new or has lower authority.
Competitive Density: Higher density indicates a more competitive keyword, so balance your choices.
By prioritizing keywords based on these factors, you can focus on those that are most likely to drive traffic to your blog.
Creating a Keyword List in SEMrush
Finally, it’s essential to organize your chosen keywords for future reference. SEMrush allows you to compile a keyword list:
Create a new list in the Keyword Magic Tool or the Keyword Overview section.
Add your selected keywords to the list, categorizing them by topic or intent.
This organized list will serve as a roadmap for your blog content strategy, ensuring you target relevant keywords consistently.
Conclusion
Finding the right keywords for your business blog is essential for achieving online success. SEMrush is a powerful tool that streamlines the keyword research process, making it easier for you to discover valuable keywords. By following the steps outlined in this guide, you can enhance your blog’s visibility and attract more readers.
Ready to boost your blog traffic? Start your keyword research with SEMrush today, and watch your content rise in search engine rankings! If you need expert guidance on optimizing your blog or developing a content strategy, reach out to The Sun Media House. We’re here to help your business thrive online.
The digital landscape is abuzz with news of a significant legal battle brewing between WordPress and WP Engine. This conflict has not only captured the attention of the tech community but also raised important questions about the implications of such disputes on the open-source ecosystem. As we delve into the details, it becomes clear that the outcome could have far-reaching effects on the future of both companies and the WordPress community at large.
Background of the Dispute
The conflict began when WP Engine, a leading managed WordPress hosting provider, filed a lawsuit against WordPress, Automattic (the parent company of WordPress), and its co-founder and CEO, Matt Mullenweg. The lawsuit centers around allegations of trademark violations and claims that Mullenweg extorted money from WP Engine. In a Reddit post, Mullenweg claimed that WP Engine’s legal actions and public statements threaten the integrity of the WordPress community, portraying themselves as victims in a narrative that is still unfolding.
According to reports, WP Engine’s attorney has accused Mullenweg of attempting to secure a significant financial settlement before his keynote speech at the recent WordCamp US Convention. The attorney described this as a “covert demand” that placed undue pressure on the company, further alleging that Mullenweg’s conduct was “disgraceful” and intended to harm WP Engine’s business reputation within the WordPress ecosystem.
Key Allegations
Trademark Violations: WP Engine alleges that Automattic has infringed on its trademarks, which raises critical questions about brand identity and the ownership of key terms associated with the WordPress platform.
Extortion Claims: WP Engine’s legal team claims that Mullenweg made threatening statements, suggesting that if the company did not comply with his financial demands, he would adopt a “scorched earth” approach against them within the community. This assertion indicates a breakdown of trust and collaboration, which are vital to the success of open-source projects.
Public Statements: Mullenweg’s comments at the WordCamp US Convention have been described as misleading and damaging to WP Engine’s reputation, with the company arguing that these statements constituted actionable wrongdoing.
Implications for the WordPress Community
The ongoing dispute poses several challenges and concerns for the WordPress community:
Trust and Collaboration: Open-source projects thrive on collaboration and trust among contributors, developers, and companies. This legal conflict threatens to erode that trust, leading to a more fragmented community where companies may become wary of one another.
Innovation Stifling: Legal battles can divert attention and resources away from innovation and improvement. Instead of focusing on enhancing the platform and user experience, companies may allocate funds to legal defenses, which could stifle the creative process necessary for progress.
Brand Identity and Market Competition: The dispute brings to light the issues surrounding brand ownership and the use of terms integral to the WordPress ecosystem. As WP Engine and Automattic navigate this legal quagmire, the community must grapple with the implications of brand identity and market competition.
Potential for Precedent: The outcome of this case could set a significant precedent for future disputes involving trademark rights within the open-source community. Should WP Engine prevail, it may embolden other companies to pursue legal action in similar circumstances, further complicating the landscape for developers and businesses alike.
Community Reactions
The reactions from the WordPress community have been mixed, with some expressing support for Mullenweg and his vision for WordPress, while others have sided with WP Engine. The case has ignited passionate discussions across forums and social media platforms, reflecting the deep-seated loyalty many users feel toward the WordPress brand and the companies that support it.
Some community members argue that Mullenweg’s actions are necessary to protect the WordPress ecosystem from perceived threats. They contend that, as the co-founder of WordPress, Mullenweg has a responsibility to ensure that the platform remains accessible and beneficial to all users. Others view the lawsuit as an unnecessary escalation that could ultimately harm the community and its members.
Developers React to Plugin Changes
The recent decision by WordPress.org to take control of a major WP Engine plugin to “remove commercial upsells and address a security issue” has generated significant concern among developers. Matt Mullenweg, cofounder and CEO of Automattic, announced the update, now known as “Secure Custom Fields,” a fork of the Advanced Custom Fields (ACF) plugin.
While Mullenweg did not specify the details of the security issue, he cited point 18 of the plugin directory guidelines, which allows WordPress to modify or remove plugins without developer consent. This move comes in light of a lawsuit filed by WP Engine against Mullenweg and Automattic, further eroding trust within the developer community. (The Verge (opens in new tab))
As a result, many developers are feeling apprehensive, with some, including Bill Erickson, the creator of the Display Posts plugin, deciding to stop using WordPress.org for their updates. This development highlights a growing divide within the WordPress community, as developers consider the implications of these changes for their projects and the overall ecosystem. (Reddit (opens in new tab))
What’s Next?
As the legal proceedings unfold, the WordPress community will be closely monitoring developments. Both parties have expressed their commitment to resolving the dispute, but the path forward remains uncertain. The potential for an out-of-court settlement exists, but if the case goes to trial, it could take months or even years to reach a resolution.
In the meantime, developers and users alike will be looking for guidance on how to navigate the implications of this dispute. The legal ramifications could affect everything from branding strategies to the way companies collaborate within the WordPress ecosystem.
Conclusion
The dispute between WordPress and WP Engine serves as a stark reminder of the challenges that can arise in the world of open-source software. As the community grapples with the implications of trademark rights and business ethics, it’s essential for all stakeholders to remain engaged and informed. Open dialogue and collaboration will be crucial in mitigating the impact of this dispute on the broader WordPress ecosystem.
As the situation develops, it is clear that the outcome will shape the future of both companies and potentially redefine the dynamics of the WordPress community. Stakeholders will need to navigate these challenges carefully, fostering an environment of trust and collaboration to ensure the ongoing success of WordPress as a leading platform for users and developers alike.
In the competitive world of online marketing, simply having a website isn’t enough — you need to make sure it can be found. This is where Search Engine Optimization (SEO) becomes essential. Effective SEO improves your site’s visibility in search engine results, driving more organic traffic and increasing your reach. While SEO might seem complex, the Yoast SEO plugin simplifies the process.
As one of the most widely-used SEO tools for WordPress, Yoast SEO offers user-friendly features that help you optimize your website effortlessly. Whether it’s improving your content’s readability, refining meta descriptions, or ensuring your site follows best SEO practices, Yoast provides valuable insights and real-time feedback to enhance your ranking.
In this guide, we’ll explore how you can leverage the Yoast SEO plugin to enhance your website’s SEO. By following these steps, you’ll be able to improve your content, make your site more search-engine-friendly, and ultimately attract more visitors.
1 Install and Configure the Yoast SEO Plugin
Before you can begin optimizing your site with the Yoast SEO plugin, you’ll need to install and configure it correctly. If you want access to extra features, you’ll need the paid version, available on the official Yoast website (opens in new tab). For this guide, we’re using the free version. Follow these steps to get started:
Step 1: Install Yoast SEO
Click to view full size (opens in new tab)
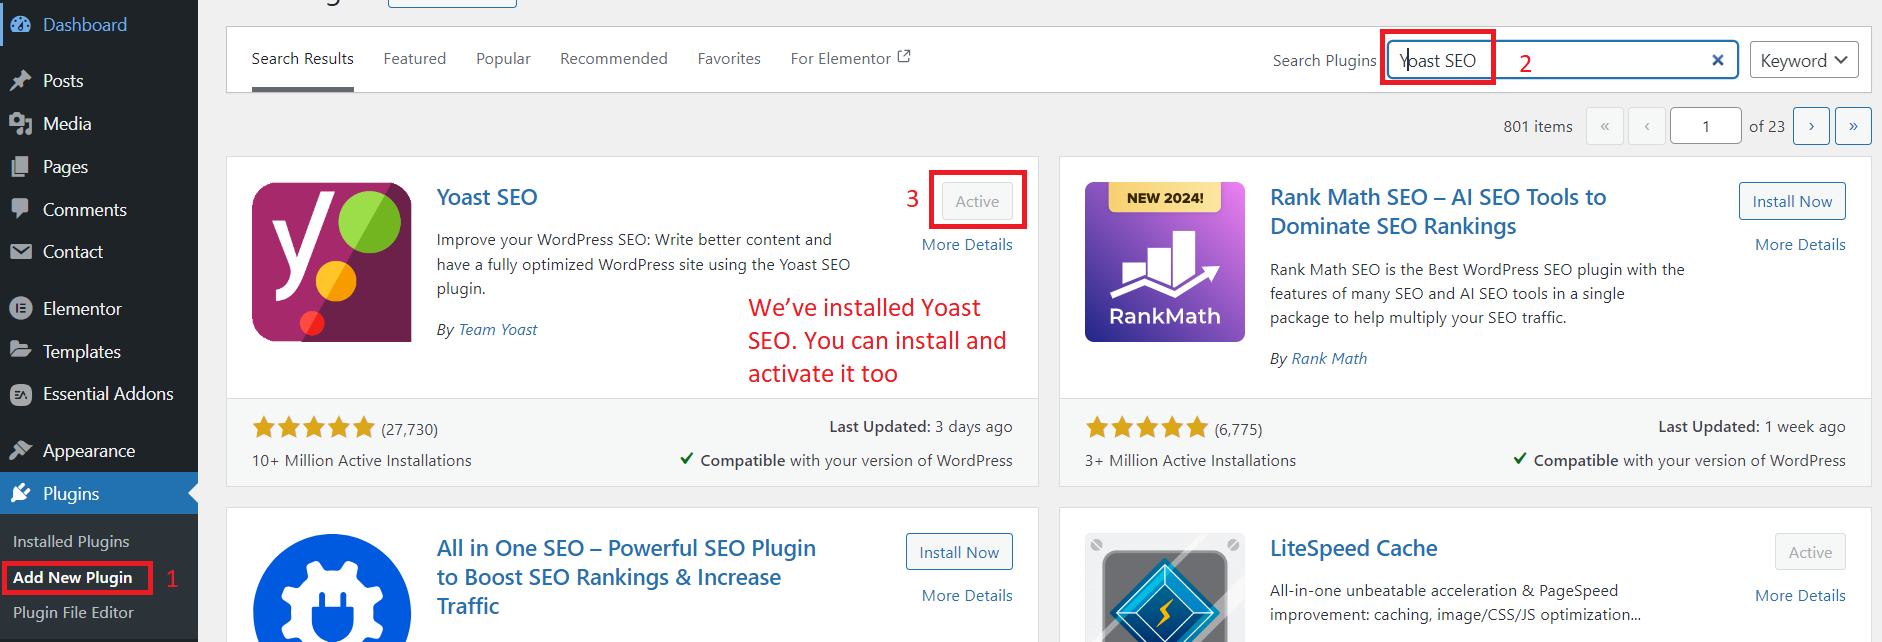
In your WordPress dashboard, navigate to Plugins > Add New.
In the search bar, type Yoast SEO.
Once you find it, click Install Now and then Activate.
After activation, you’ll see a new menu item labeled SEO in your WordPress dashboard.
Step 2: Configure Yoast SEO
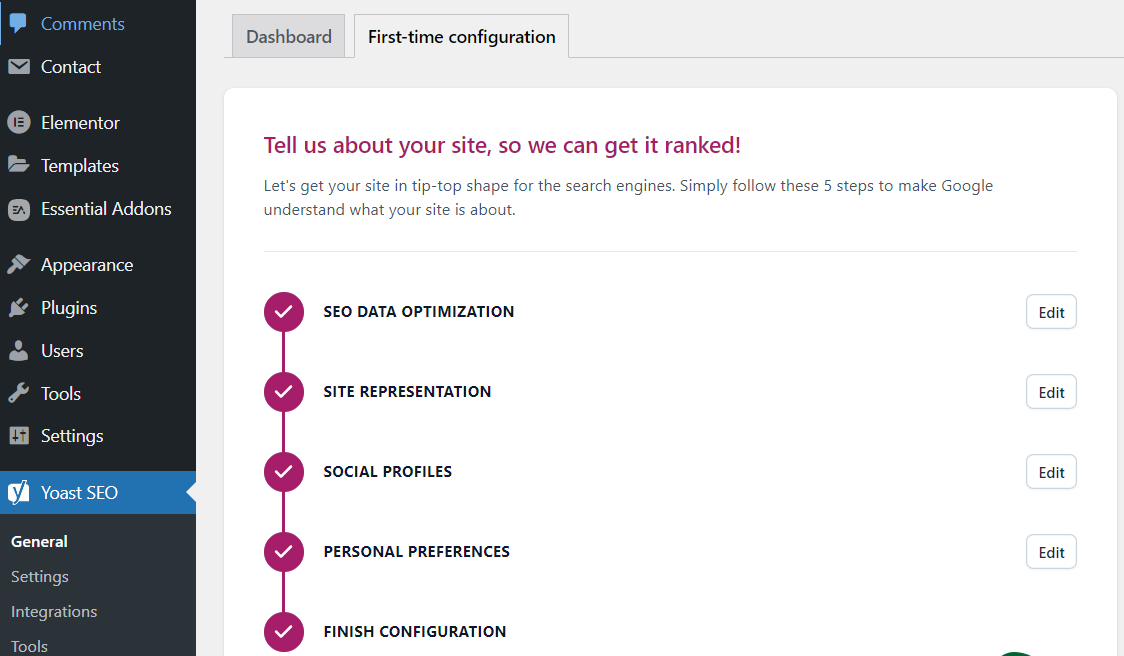
Yoast SEO offers a setup wizard that guides you through the basic configuration process. This is a great starting point if you’re new to SEO.
Click to view full size (opens in new tab)
Click on SEO in your dashboard, and select General.
Go to the Configuration Wizard tab and click Open the Configuration Wizard.
The wizard will walk you through key settings such as:
Site Type: Define whether your site is a blog, online store, news site, or something else.
Organization/Person: Choose whether your website represents a business or an individual.
Search Engine Visibility: Ensure that you allow search engines to index your site.
Number of Authors: Indicate whether your site has multiple authors, which helps with author archives.
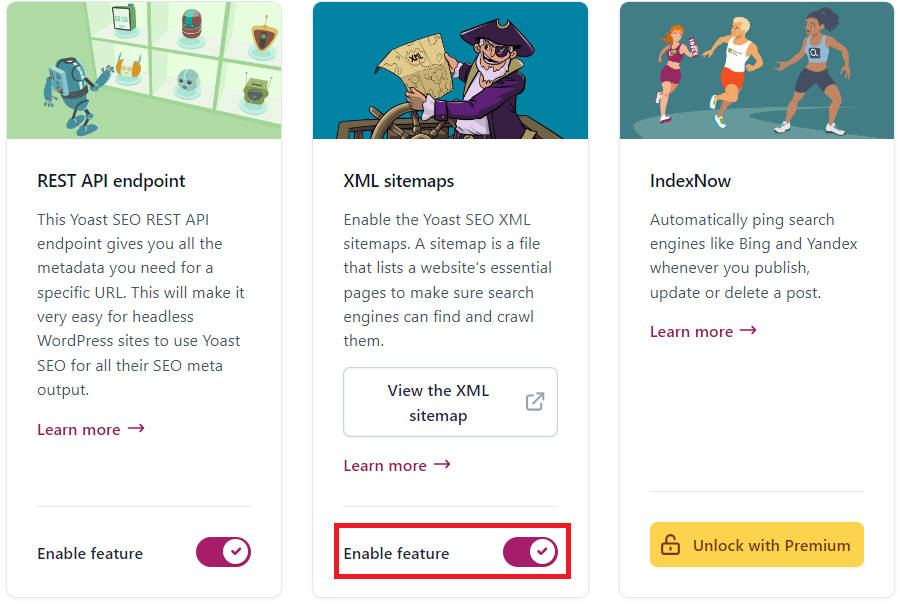
Step 3: Set Up XML Sitemaps
Yoast SEO automatically generates an XML sitemap for your website, which is essential for helping search engines like Google crawl and index your pages.
Click to view full size (opens in new tab)
Go to SEO > General > Settings.
Ensure the XML Sitemaps option is turned on (it should be enabled by default).
You can view your sitemap by clicking the question mark next to this feature and selecting See the XML Sitemap.
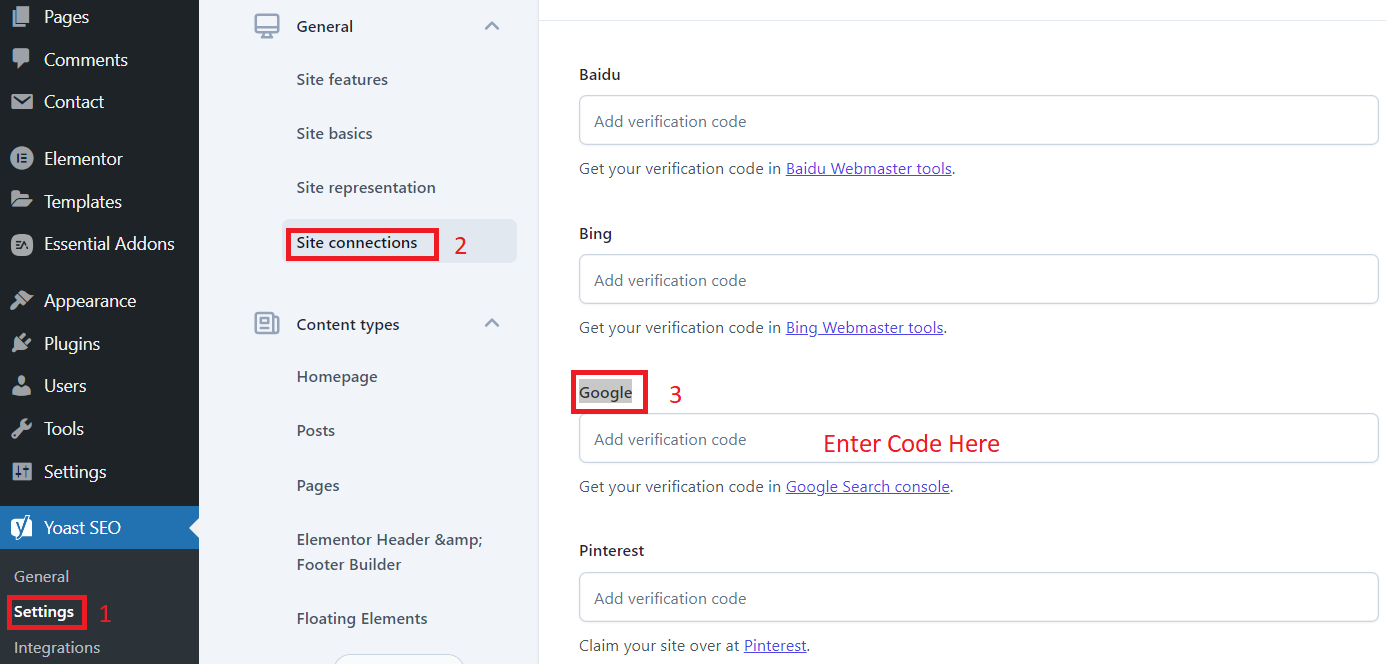
Step 4: Connect to Google Search Console (Optional but Recommended)
Google Search Console allows you to monitor your website’s search performance. You can easily integrate it with Yoast SEO or you can integrate any other method as well.
Click to view full size (opens in new tab)
Go to SEO > Settings > Site connections > Google.
Enter your Google Search Console verification code to link your site and start tracking important SEO metrics.
By installing and configuring Yoast SEO, you’ve laid the foundation for a well-optimized website. The plugin’s automatic features, like the XML sitemap and Google integration, help search engines discover and index your content quickly and efficiently.
2 Optimize Your Content with Yoast SEO
One of the most powerful features of the Yoast SEO plugin is its ability to optimize your content for both search engines and readers. Here’s how to make the most out of its content optimization tools:
Step 1: Keyword Research and Focus Keyphrase
Before optimizing, identify the focus keyword you want to rank for. This is the primary term people will search for to find your content. Use tools like Google Keyword Planner or Ubersuggest to find relevant keywords with good search volume and low competition.
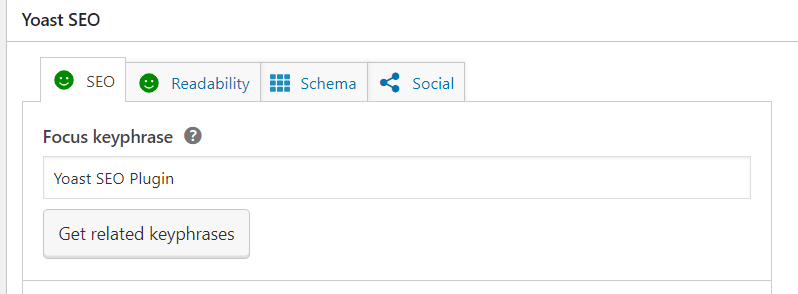
How to Use the Focus Keyphrase Feature:
After writing your content, scroll down to the Yoast SEO box below the post or page editor.
In the Focus Keyphrase field, enter the main keyword you want to target.Click to view full size (opens in new tab)
Yoast will analyze your content and provide feedback on how well your page is optimized for that keyword.
Step 2: Optimize Keyword Usage
Yoast will evaluate your content and show recommendations on where to improve keyword placement. To fully optimize your page, aim to include the focus keyphrase in the following areas:
Page Title: Make sure your keyphrase is in the title of your content.
Subheadings (H2, H3, etc.): Use the keyword in at least one subheading for better keyword distribution.
First Paragraph: Include your keyword naturally within the first 100 words.
Body Text: Ensure that your keyword appears throughout the body but avoid keyword stuffing. Yoast’s feedback will indicate whether your keyword density is too low or too high.
URL Slug: Your URL should be short and contain the keyphrase.
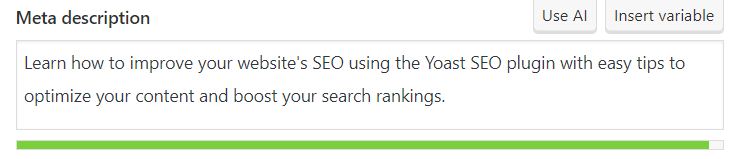
Meta Description: This is the snippet that appears in search engine results. Yoast allows you to customize it, and it’s crucial to include your focus keyword here to entice users to click.
Step 3: Utilize Synonyms and Related Keywords
In addition to your focus keyword, Yoast encourages the use of related keyphrases or synonyms. This makes your content more comprehensive and helps you rank for a broader set of search terms.
Scroll down to the Yoast SEO box and click the Related Keyphrase section (optional, not required).
Enter any relevant terms or variations of your focus keyphrase. Yoast will analyze and provide feedback on the inclusion of these terms in your content.
Step 4: Readability Optimization
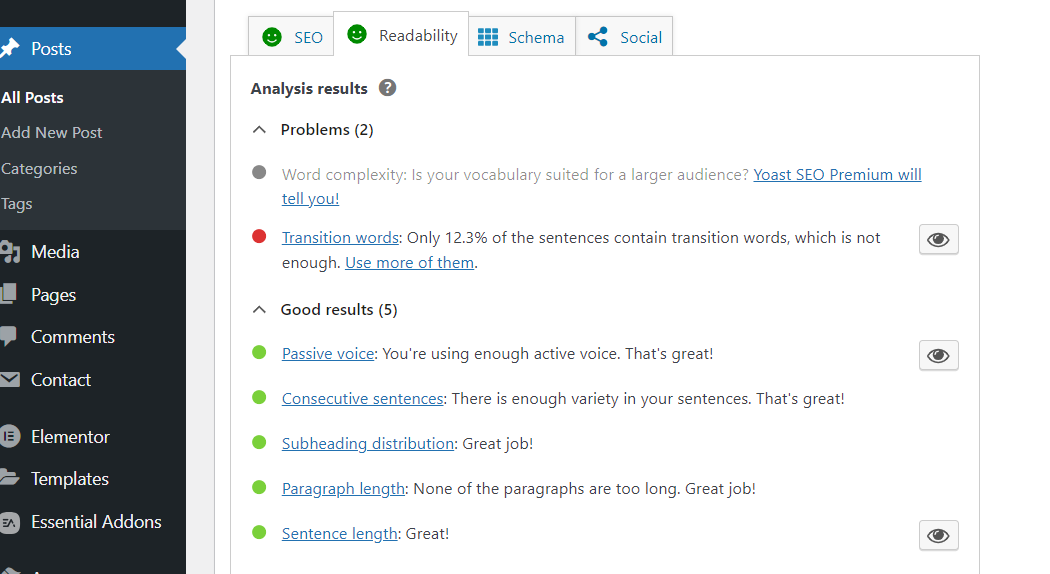
Yoast SEO doesn’t just analyze keywords — it also helps you ensure that your content is easy to read. Under the Readability tab, Yoast assesses:
Click to view full size (opens in new tab)
Sentence Length: Avoid overly long sentences. Aim for a mix of shorter and medium-length sentences.
Paragraph Length: Break up long blocks of text to improve readability.
Transition Words: Use words like “however,” “therefore,” or “in addition” to create flow in your content.
Passive Voice: Minimize the use of passive voice to make your writing more engaging.
Each of these factors is rated, and Yoast provides tips for improving them. The goal is to make sure your content is both SEO-friendly and reader-friendly.
Step 5: Image SEO
Images play a significant role in both user experience and SEO. Yoast helps ensure your images are optimized by reminding you to:
Click to view full size (opens in new tab)
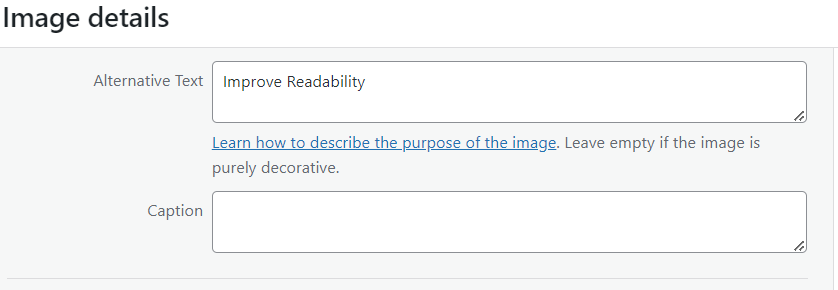
Use Alt Text: Add descriptive alt text to every image, and where appropriate, include your focus keyword.
Optimize File Names: Use keyword-rich file names for images before uploading them to your site.
Step 6: Content Analysis Feedback
Once you’ve implemented Yoast’s suggestions, the plugin will give your page a score. It uses a simple color-coded system:
✓Green: Your content is well-optimized for SEO and readability.
!Orange: There’s room for improvement.
✕Red: Significant SEO issues need to be addressed.
Pro Tip: Use Cornerstone Content
Yoast allows you to mark essential, long-form content as cornerstone content. These are the main articles or pages that provide the most comprehensive information on a topic, and they should be internally linked frequently.
To mark a piece as cornerstone content, in the Yoast SEO box, under the Focus Keyphrase section, check the Cornerstone Content box — then make sure you link to this cornerstone content from other pages, increasing its internal SEO value.
3 Optimize Meta Tags
Meta tags play a crucial role in how search engines and users perceive your content. Yoast SEO helps you optimize these tags to improve your visibility in search results. Here’s how:
Step 1: Edit the SEO Title
Your SEO title is the clickable headline that appears in search results. It should be compelling and include your focus keyword.
Keep it under 60 characters so it doesn’t get cut off.
Make sure the keyword appears naturally, preferably toward the beginning.
To edit:
Scroll to the Yoast SEO box below your content editor.
In the SEO Title field, you can customize your title by typing directly or using Yoast’s placeholders.Click to view full size (opens in new tab)
Step 2: Customize the Meta Description
The meta description is the snippet of text shown under the title in search results. Though it doesn’t directly affect rankings, a well-written meta description can improve your click-through rate (CTR).
Keep it under 160 characters.
Include your focus keyword to show relevance to searchers.
Write a compelling summary that encourages users to click.
To edit, in the Yoast SEO box, fill in the Meta Description field with a concise, keyword-rich summary.
Click to view full size (opens in new tab)
Step 3: Optimize the Slug (URL)
The slug is the part of the URL that comes after your domain name. A clean, concise slug that includes your keyword helps both search engines and users understand what the page is about.
Keep it short and relevant.
Avoid unnecessary words (e.g., “the,” “and”).
Include your focus keyword.
To edit, look at the URL Slug section in the Yoast SEO box and adjust the text to reflect your keyword.
Click to view full size (opens in new tab)
Step 4: Preview Your Snippet
Click to view full size (opens in new tab)
Yoast SEO provides a preview of how your title, meta description, and URL will look in search results. Use this to check if everything fits and appears well-structured.
4 Set Up a Solid Internal Linking Strategy
Internal linking helps guide users through your site and improves SEO. Here’s how to use Yoast SEO for an effective internal linking strategy:
Add Relevant Links: Link to related content within your site. Use descriptive anchor text that clearly indicates what the linked page is about.
Use Cornerstone Content: Mark key articles as cornerstone content in Yoast. These are your main, in-depth pieces that deserve more internal links.
Maintain Clear Structure: Ensure your links create a logical flow. Link more frequently to important pages and keep less critical pages linked less often.
Check for Broken Links: Regularly look for and fix any broken internal links. This keeps your site user-friendly and helps with SEO.
5 Utilize Schema Markup and Rich Snippets
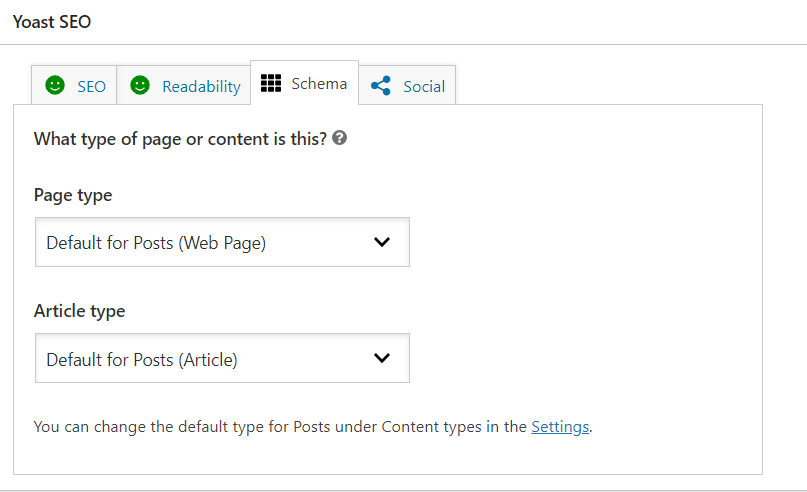
Schema markup helps search engines better understand your content, and rich snippets display enhanced information in search results, such as ratings, prices, and FAQs. With Yoast SEO, you can easily add schema markup to your pages without coding.
Click to view full size (opens in new tab)
Yoast automatically includes essential schema data for posts and pages. To further customize it, simply:
Go to the “SEO” section in your WordPress dashboard.
Under “Search Appearance,” configure how you want your content to appear in rich results.
For specific content types, choose from Article, FAQ, How-to, and more.
Using schema markup improves visibility in search results, driving more clicks to your site by enhancing how your content is presented.
✓ Conclusion
Optimizing your website with the Yoast SEO plugin is a powerful way to improve your search engine rankings and enhance user experience. By focusing on content optimization, readability, meta tags, internal linking, and schema markup, you can create a site that not only attracts visitors but also keeps them engaged.
If you’re looking for expert guidance in enhancing your online presence, The Sun Media House is here to help. Our team specializes in SEO strategies tailored to your needs, ensuring that your website stands out in the crowded digital landscape.
Imagine you’ve just opened a cozy little café in your neighborhood. You’ve put a lot of love into your recipes and décor, and your first customers are enjoying your delicious treats. But there’s one thing missing: many people still don’t know about your café!
That’s where a website comes in. Think of your website as an online version of your café, where people can learn about your menu, see your hours, and find out what makes your café special, all from their computers or phones.
Building a website might sound complicated, but with WordPress, it’s surprisingly simple. WordPress helps you create a professional-looking website without needing any technical skills. In this guide, I’ll show you how to set up your small business website with WordPress, step-by-step. We’ll cover everything from picking a domain name to launching your site.
By the end, you’ll have a fantastic website that helps more people discover your café and keeps your business growing.
1 Plan Your Website
Planning is the foundation of a successful website. Begin by identifying what you want your website to accomplish, such as attracting more customers, providing information, or selling products.
Next, think about your target audience and what they need. Tailoring your content to their interests will make your site more appealing. Outline the key pages you’ll need, like Home, About Us, Services, and Contact, and create a simple site map to organize these ideas.
Finally, choose a design that reflects your brand’s identity, including colors, fonts, and images. This thoughtful planning will ensure your website effectively meets your goals and engages your visitors.
2 Choose a Domain Name and Hosting
To get your website online, you need to pick a domain name and choose a hosting service.
First, choose a domain name that represents your business and is easy to remember. It should be short and relevant to what you do. After deciding on a domain name, register it with a domain registrar like Namecheap, which is known for its affordable and reliable services.
Click to view full size (opens in new tab)
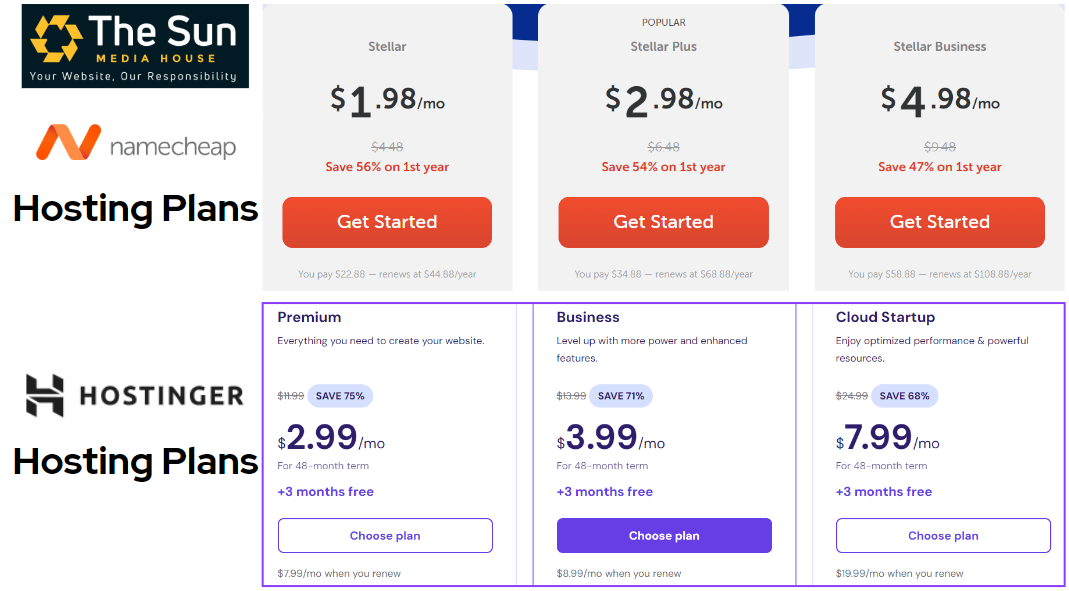
Next, select a hosting provider to store your website files and make your site available on the internet. For small businesses, Namecheap (opens in new tab) or Hostinger (opens in new tab) is a great option. It offers budget-friendly hosting plans with excellent performance and customer support.
Click to view full size (opens in new tab)
Once you’ve registered your domain and set up hosting, connect them so your website can go live. This will set the stage for building and launching your site.
3 Install WordPress
Now that you’ve registered your domain and set up your hosting, it’s time to install WordPress.
Since we’re using Namecheap hosting for this tutorial, here’s how to get started. First, log into your Namecheap account and open your hosting control panel, also known as cPanel. If you’re using a different hosting provider, the process will be similar, but the interface might look slightly different.
Click to view full size (opens in new tab)
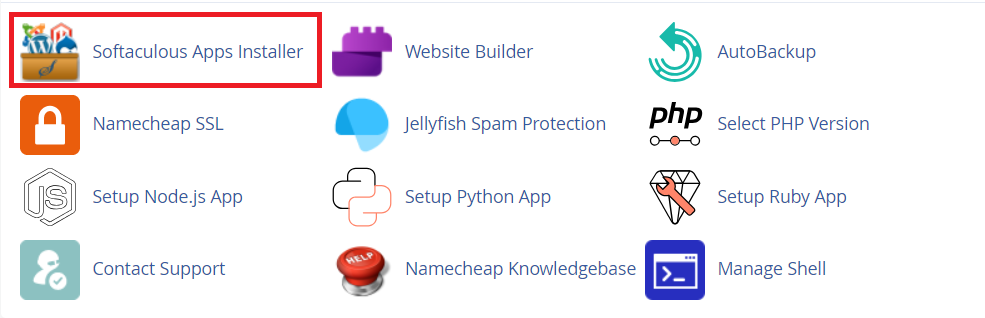
Once in cPanel, find the section called “Softaculous Apps Installer” or “WordPress Tools” — this is where you can install WordPress easily.
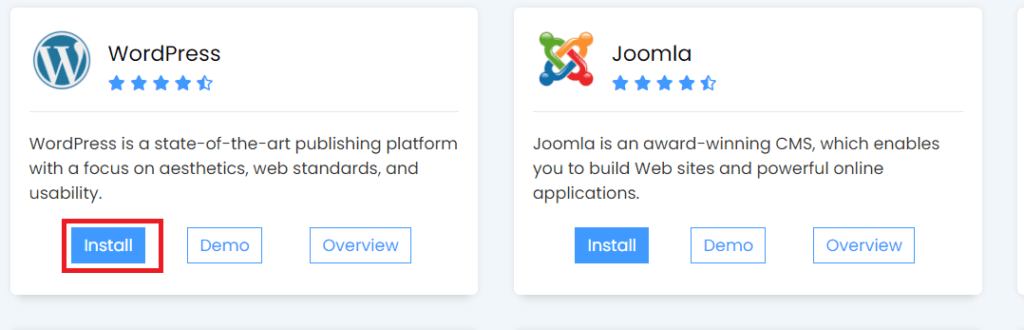
Click on the WordPress icon, and it will guide you through the installation steps.
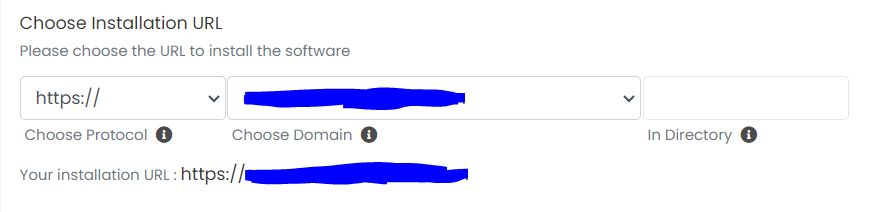
Choose your domain: Select the domain where you want to install WordPress (the one you registered earlier).Click to view full size (opens in new tab)
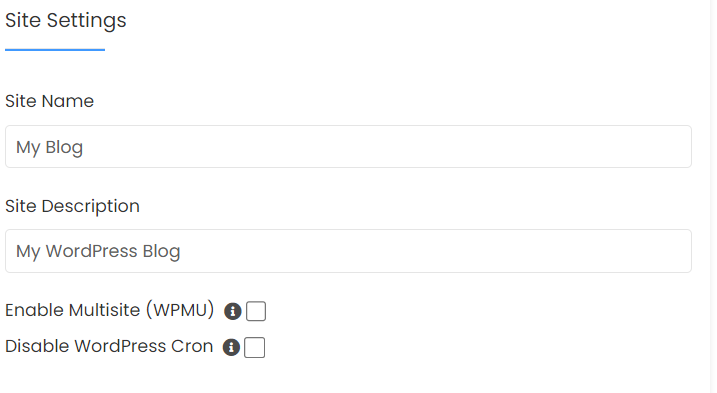
Fill in site details: Add a site name and description. These can be changed later, so don’t worry if you’re not sure yet.Click to view full size (opens in new tab)
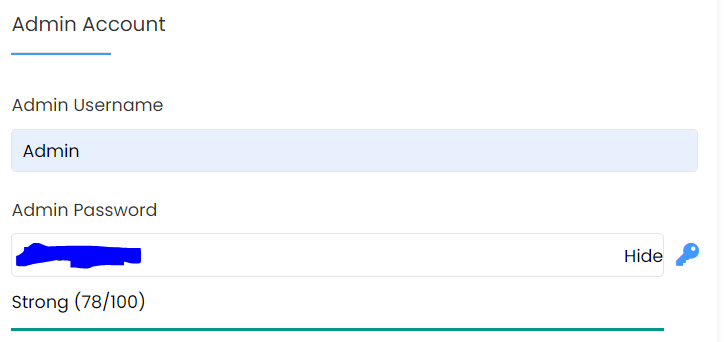
Create login details: Set up your admin username, password, and email address. Be sure to choose a strong password to keep your site secure.Click to view full size (opens in new tab)
Install WordPress: Once everything is filled in, click Install. The process will take a few moments.Click to view full size (opens in new tab)
After WordPress is installed, you’ll get a link to your website’s admin dashboard, where you can start customizing and building your site.
4 Choose and Customize Your Theme
Now that WordPress is installed, it’s time to make your website look great by choosing a theme. A theme controls the overall design and layout of your site, and one of the best options for small business websites is the Astra theme.
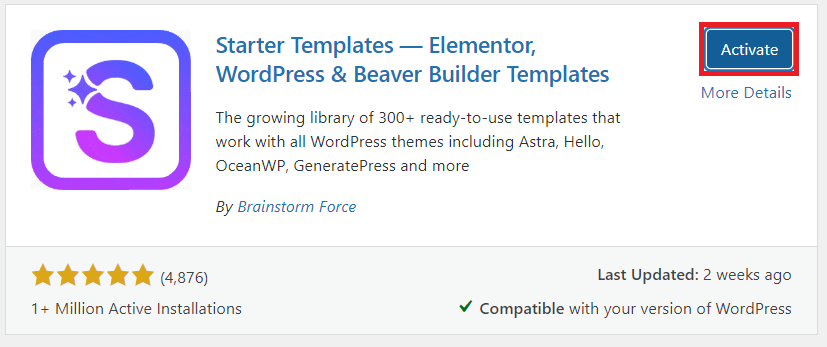
For this tutorial, we’ll be using Astra along with its plugin called Starter Templates to help you quickly set up a professional-looking website.
Install the Astra Theme
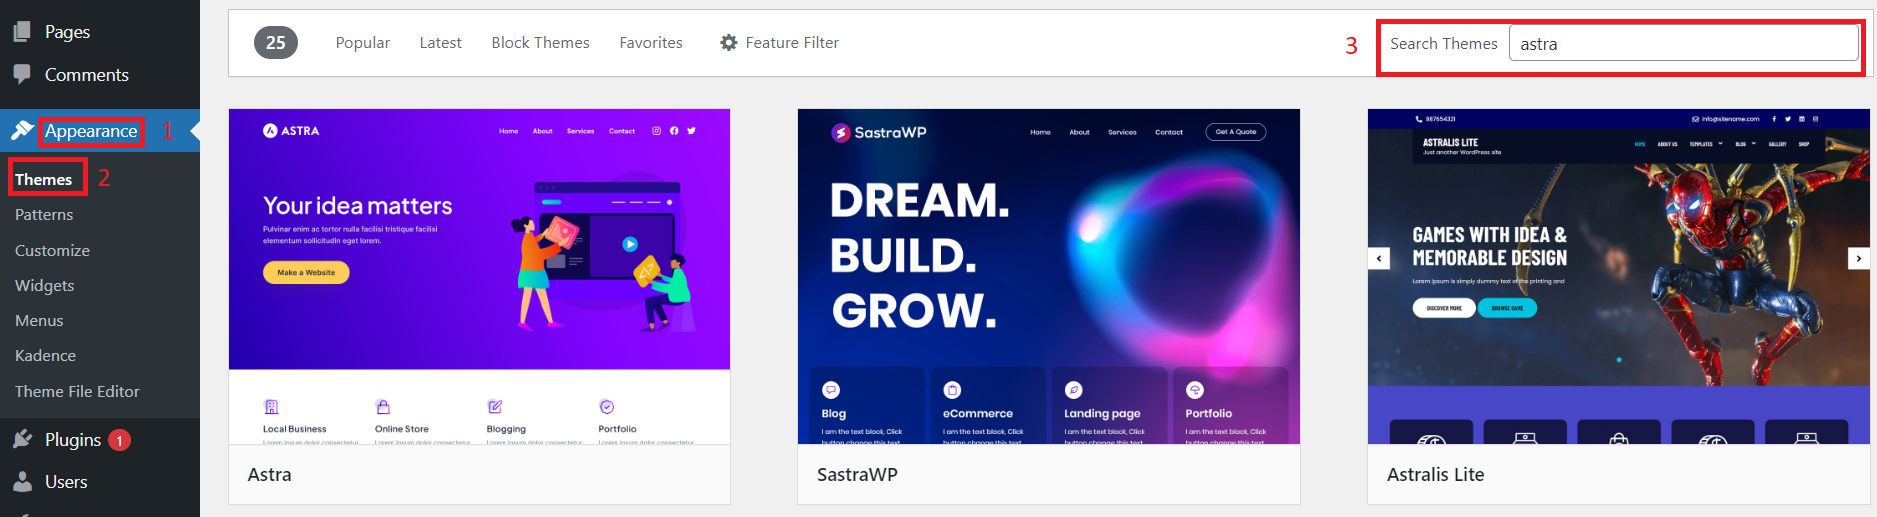
From your WordPress dashboard, go to Appearance > Themes.
Click on the Add New button at the top.
In the search bar, type Astra and then click Install when you find it.Click to view full size (opens in new tab)
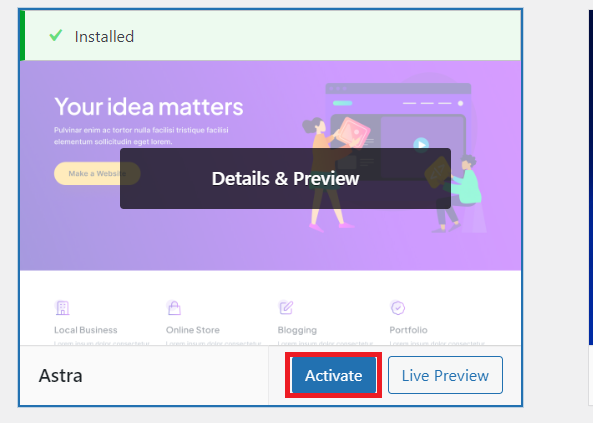
After installation, click Activate to apply the theme to your website.
Install the Starter Templates Plugin
After activating the Astra theme, you’ll see a prompt recommending the Starter Templates plugin.
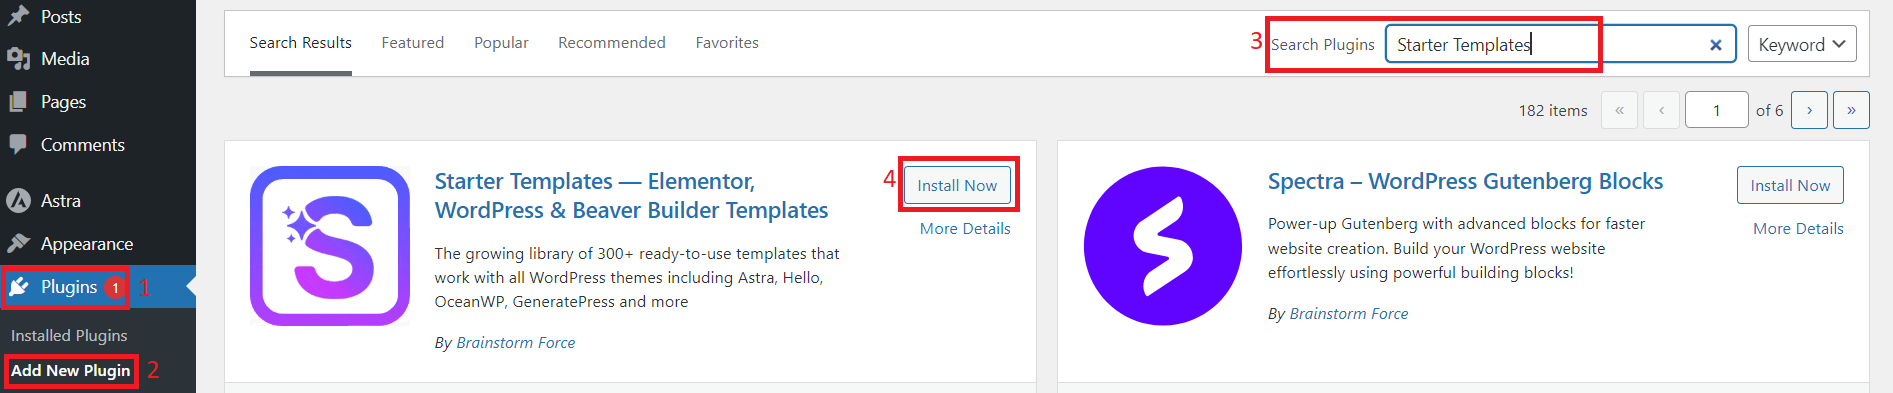
Click on Get Started or go to Plugins > Add New, then search for Starter Templates.Click to view full size (opens in new tab)
Click Install and then Activate.
Choose a Template
With the Starter Templates plugin active, go to Appearance > Starter Templates.
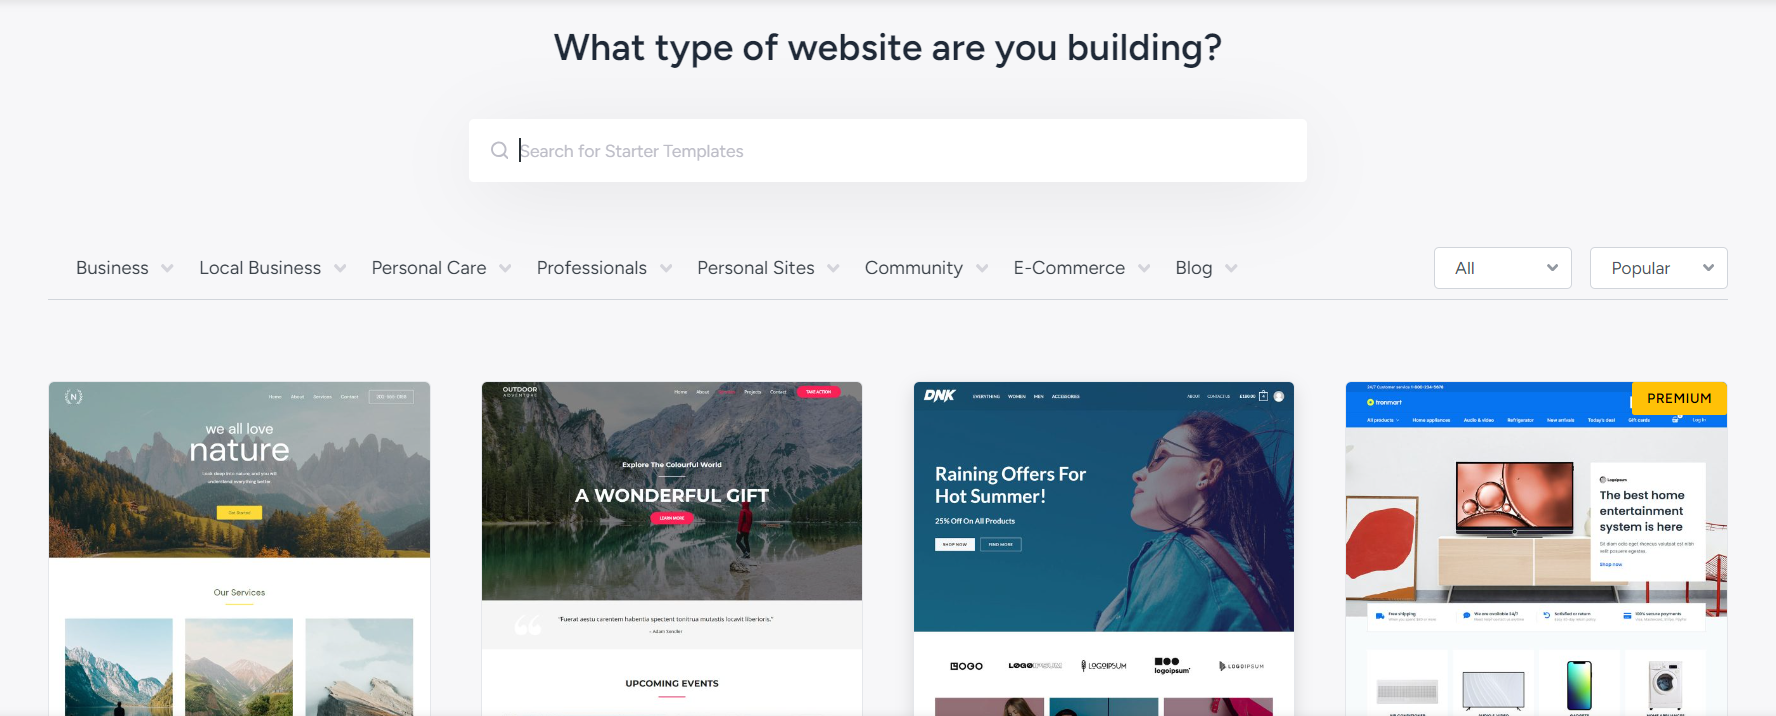
Here, you can browse a variety of pre-built website templates designed for different industries.Click to view full size (opens in new tab)
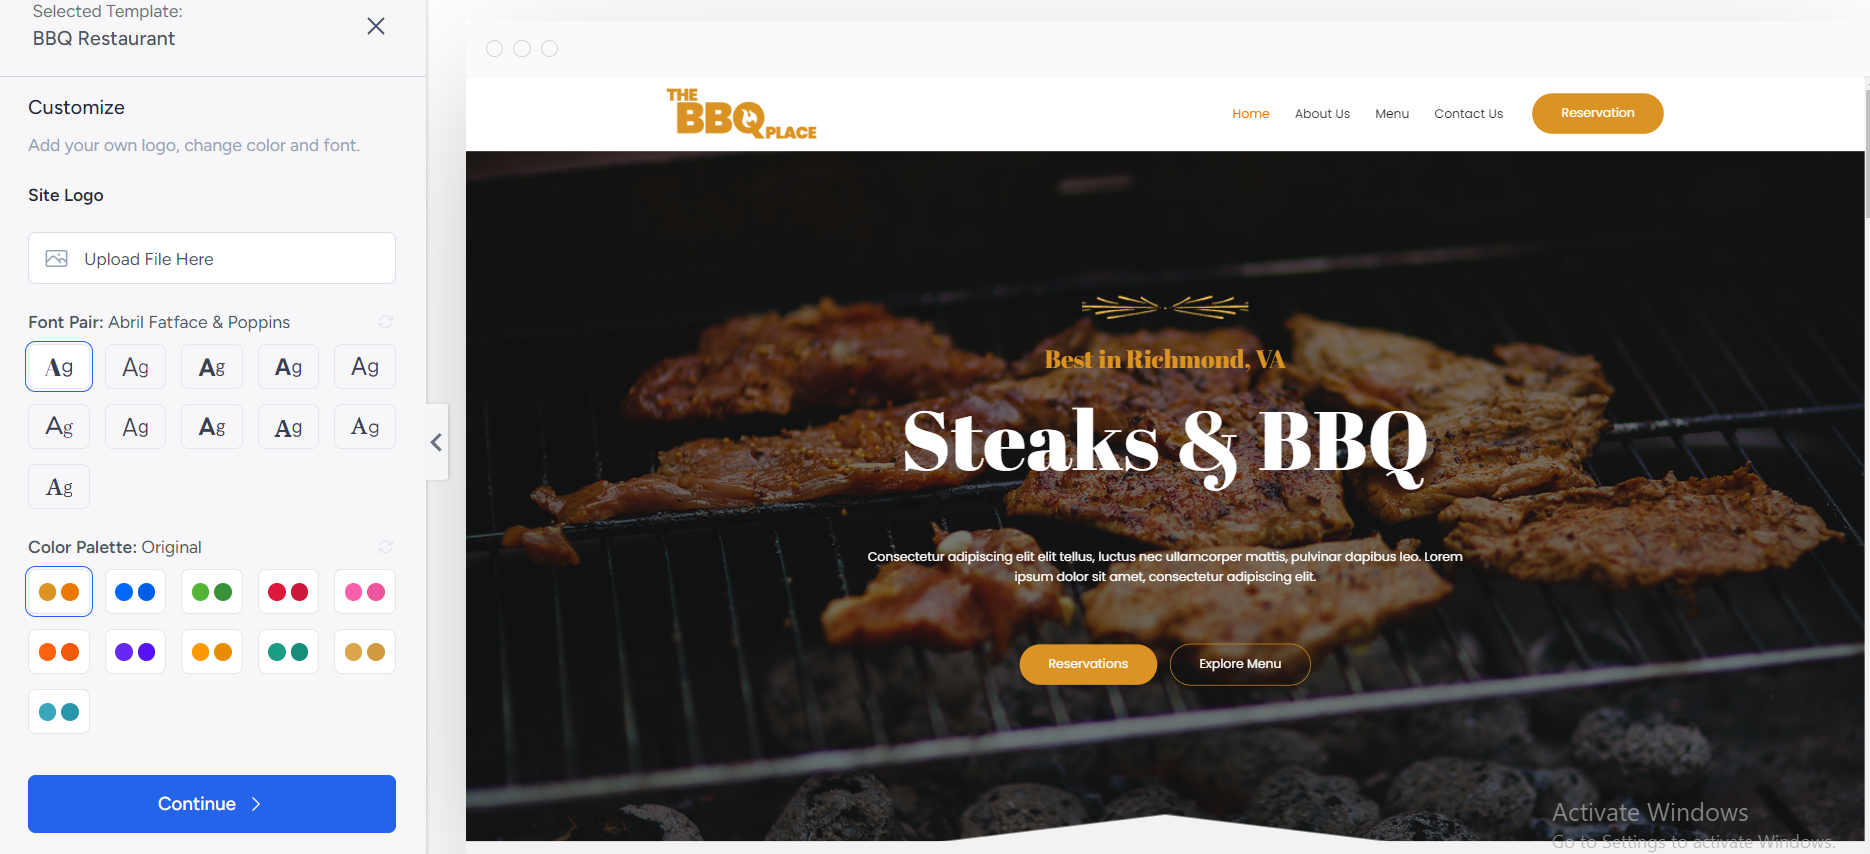
Choose a template that matches your business and click Import Complete Site to load all the pages and settings.Click to view full size (opens in new tab)
Customize Your Site
Now that the template is installed, you can customize it to fit your brand.
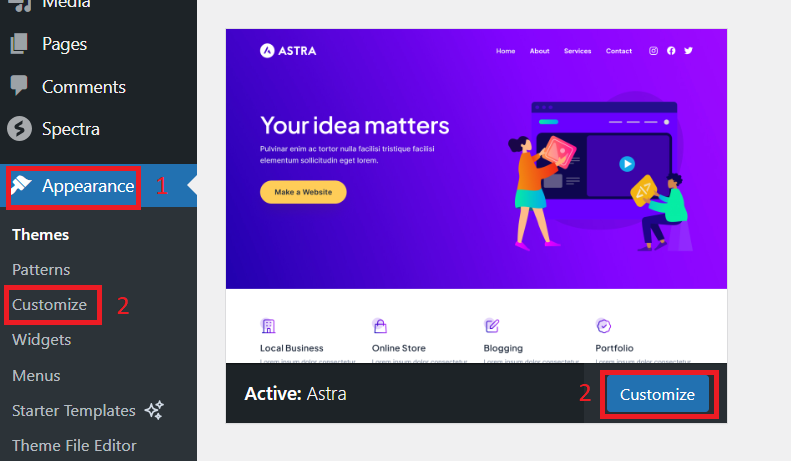
Go to Appearance > Customize to edit the logo, colors, fonts, and layout.Click to view full size (opens in new tab)
A second screenshot was originally included here but the image file is no longer available in the media library — worth re-uploading if you have the original.
You can also go to individual pages and update the content with your own text, images, and links by using the block editor or a page builder like Elementor, depending on the template you chose.
Astra and Starter Templates make it easy to create a professional site quickly, with plenty of customization options to make it your own. Once you’ve made your changes, click Publish to save your customizations and bring your website to life.
5 Add Essential Pages and Content
Now that your theme is ready, it’s time to add important pages and content to your site. Here are the key pages every small business website should have:
Home Page: The main page where you introduce your business with a strong headline and clear call-to-action buttons.
About Us Page: Share your story, what your business does, and what makes it unique.
Services/Products Page: Display your services or products with descriptions and images. Make it easy for visitors to learn more or buy.
Contact Page: Provide your address, phone number, email, and a contact form so visitors can reach you easily.
Blog (Optional): Share updates, tips, or industry news to engage customers and improve SEO.
Privacy Policy and Terms (Optional): Important if you collect any customer data.
Once you’ve added these pages, start filling them with content that’s simple, clear, and aligns with your brand.
6 Install and Configure Plugins
Plugins are like apps for your WordPress site. They add features and functionality, making your website more powerful. Here’s how to install and configure essential plugins:
Install Plugins
From your WordPress dashboard, go to Plugins > Add New.
Use the search bar to find the plugins you need.
Click Install Now, then Activate once the plugin is installed.
Essential Plugins to Consider
Yoast SEO: Helps optimize your content for search engines so more people can find your site.
Wordfence Security: Protects your website from hackers and malware.
WPForms: Allows you to easily add contact forms to your site.
Smush: Compresses images to make your site load faster.
WooCommerce: If you’re selling products, this plugin helps you set up an online store.
Configure Plugins
After installation, each plugin will have its own settings. Go to the plugin’s settings page (usually found under Settings or in its own menu item) and follow the prompts to configure it according to your needs.
By adding and configuring plugins, you can enhance your website’s performance, security, and usability.
✓ Conclusion
Creating a small business website with WordPress is a straightforward process when you take it step by step. By carefully planning your site, choosing the right domain name and hosting provider, installing WordPress, and customizing your theme, you’re laying a strong foundation for your business’s online presence. Adding essential pages such as Home, About, Services, and Contact, and configuring important plugins, will enhance the functionality and user experience of your website.
A well-designed website is more than just a digital space; it’s a tool that helps you connect with your customers, showcase your products or services, and grow your business. However, as easy as WordPress is to use, building a professional, high-performing site can still be overwhelming, especially if you’re focused on running your business.
That’s where The Sun Media House can help. With our team of experts, we offer personalized guidance and tailored solutions to ensure your website not only looks great but also performs at its best. Whether you need help with design, content, SEO, or digital marketing, we are here to assist. Let us help you turn your vision into a website that drives success.
A Google Shop is an online marketplace that allows retailers to showcase and sell their products directly through Google. Google Shop is part of Google’s larger e-commerce platform, Google Shopping, which enables consumers to search and compare products from various retailers.
Users searching for a product on Google may see a “Shop on Google” section in the search results. This section includes images of products, prices, and other details, and users can click through to purchase the item directly from the retailer’s website or through Google. SEO services also play a crucial role in Google Shop ranking your product higher.
To participate in Google Shop, retailers must set up a Google Merchant Center account and create product listings that meet Google’s guidelines. Then, they can create and manage their Google Shop listings through their Google Merchant Center account.
Google Shop can be a powerful tool for retailers to increase their online visibility and reach more potential customers through Google’s vast audience.
Curious what shows up when people search for us? Take a look at our own Google presence.
 The Sun Media House